🌍Avail: Deploy an AppChain using Madara & Karnot

© by Avail Project
Three weeks ago, we set up our Avail node; but unfortunately we missed the opportunity to become an official validator as the project had already filled its quota of validators. However, the arrival of the exciting Clash of Nodes challenge presents us with a fresh opportunity to participate and contribute to this pioneering project. Although I usually offer an extensive overview of the projects we explore, I’ll skip that step this time as I covered it in detail in my initial blog post about Avail. For detailed insights into the project and instructions on setting up an Avail node, I encourage you to refer to that earlier article. It’s worth noting, though, that establishing an Avail node is not a prerequisite for deploying an appchain with Madara.
Joining the Madara | Karnot Appchain Challenge
The Madara | Karnot Appchain Challenge, a new section of the innovative Clash of Nodes initiative, marks a significant partnership between Karnot and Avail. This tutorial provides detailed guidance on setting up a Madara AppChain using Avail as the data availability (DA) layer. We have the flexibility to either self-host our appchain or employ Karnot’s chain-running service.
Participation Steps: To participate in the Madara | Karnot Appchain Challenge, we need to follow these steps:
- Set Up a Madara Appchain:
- — Use the Karnot CLI for quick and efficient setup, which we will self-host through a VPS provider
- Integration with Avail’s Goldberg Testnet:
- — Ensure our chain data is posted on the Avail Goldberg testnet
- Account Funding:
- — Access the Avail Goldberg faucet to obtain tokens, enabling operations within the Goldberg testnet environment
- Listing Our Appchain:
- — To participate in the Clash of Nodes, we must submit a Pull Request to include your appchain in the official Karnot CLI repository
Part 1: Order and configure your VPS
To get started with installing your node, you’ll first need to rent a VPS (Virtual Private Server). Using a VPS offers several advantages, such as enhanced performance, scalability and reliability. I’ll guide you through the process of renting a VPS at a lower cost, and show you how to configure it. Follow the steps below to get your VPS ready for the node installation. Research VPS providers: Take some time to explore different VPS providers available in the market. Consider factors like pricing, reputation, and customer reviews to find the right fit for your needs. Look for plans that offer the appropriate amount of resources (CPU, RAM, storage) to support your node. Contabo is my preferred choice due to their combination of affordable pricing, reliable performance, and user-friendly interface.
I personally use and trust Contabo for my blockchain nodes. I’ve recently joined their affiliate program to recommend their services. If you decide to use my affiliate links for Contabo, you’ll be supporting my work at no extra cost to you. This support is important for continuing our journey together in the fascinating world of crypto, and using these affiliate links is a direct and impactful way to back my efforts. Thank you very much for your support!
The recommended hardware configuration is “4 CPU cores / 8 GB RAM / 160 GB SSD”. Since the same VPS can be used for the “Dymension RollApps” challenge, which I will be covering in the future, I recommend considering the Cloud VPS 2 package. This package offers a well-balanced combination of performance and efficiency to meet these requirements. If you intend to operate only the Madara | Karnot Appchain, you can choose the Cloud VPS 1 package.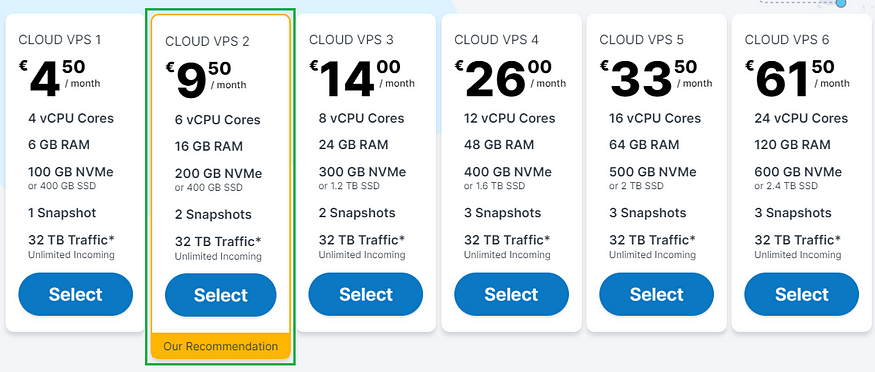 I will initially select a rental period of 1 month, with the flexibility to extend it later if needed:
 Make sure to choose the option “European Union (Germany)”:
 For the best storage solution, I recommend selecting the 400GB SSD storage type.
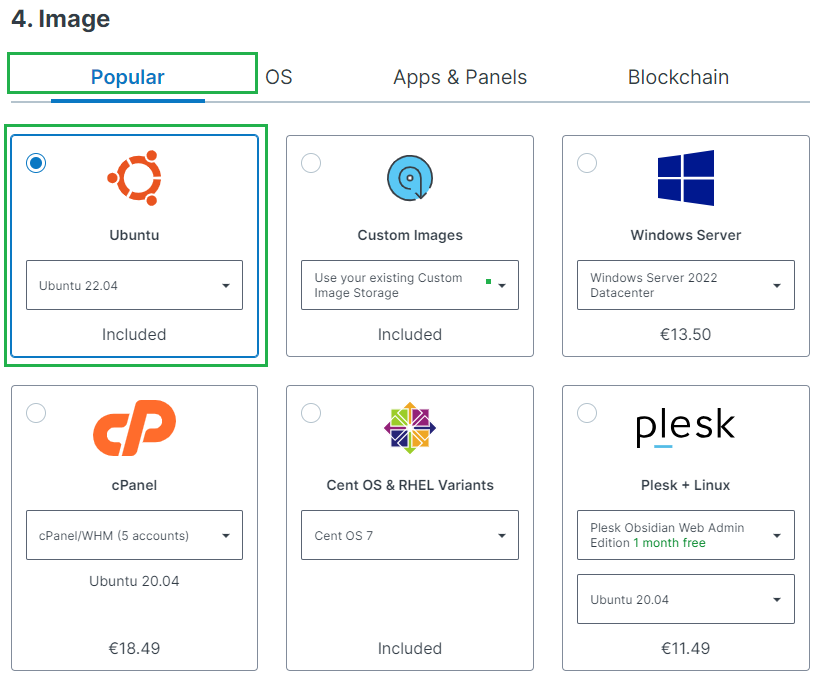
 Navigate to either the “Popular” or “OS” tab and choose the standard Ubuntu 22.04 image from there:
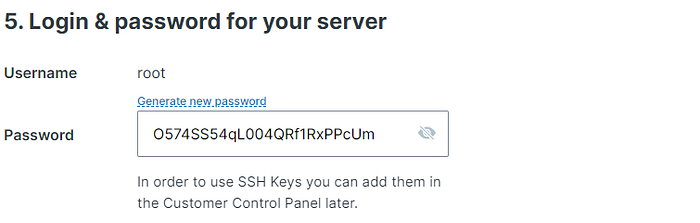
 To prioritize security, I highly recommend to generate a password and securely store it to ensure maximum protection:
 For the final step, it’s recommended to leave the sections titled “Object Storage”, “Networking”, and “Add-Ons” in their default state without any modifications. If you are new to Contabo, please create an account; otherwise, login using your existing credentials. Provide your personal data by filling in the required fields. Complete the remaining fields with your personal information, and click the “Next” button to proceed with the payment. After successfully completing the payment for your order, you will receive an initial email. Within approximately 15 minutes, you will receive a second email containing all the information needed to connect to your VPS.
Part 2: Connect to your VPS via SSH
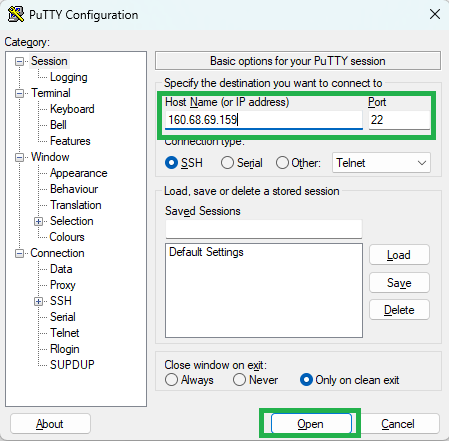
Download and install most recent edition of PuTTY by visiting the official website: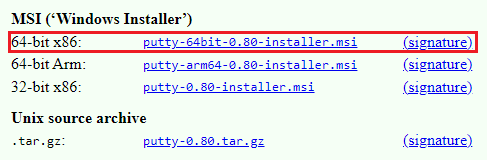 You will find the IP adress of your VPS in the second email. Launch PuTTY, enter the IP address of your VPS and click “Open”:
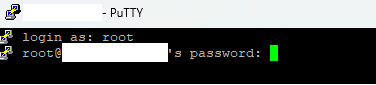
 Once the server interface is open, you will be prompted to provide login details; simply enter “root” as the user and use your chosen password:
 Congratulations! You are now successfully logged into your server: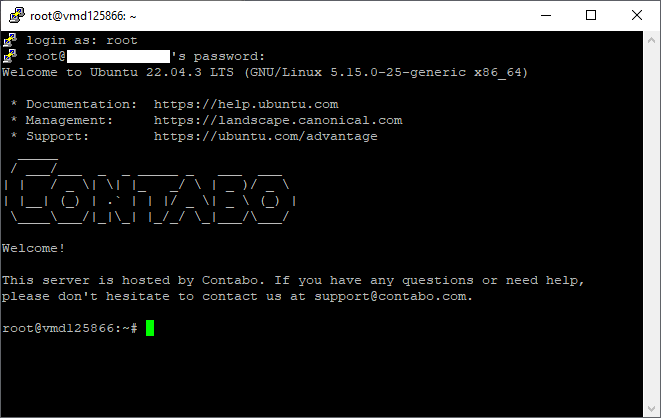
Part 3: Preparations
To continue, we can update the packages by running the following commands in the terminal. The first part of the command (sudo apt update) updates the package lists for upgrades, and the second part (sudo apt upgrade -y) actually performs the upgrades with the “-y” flag allowing for automatic confirmation of prompts during the upgrade process:
sudo apt update && sudo apt upgrade -y
Part 4a: Install Rust
To begin, we will install Rust using the rustup installer:
curl --proto '=https' --tlsv1.2 -sSf https://sh.rustup.rs | sh
When asked to select an installation option, we will enter “1” for the default installation and then press the Enter key: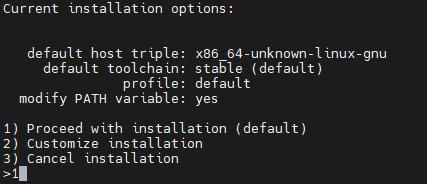 We will use the source command which loads environment variables and configurations for the Rust programming language into the current shell session:
source $HOME/.cargo/env
Let’s now check the Rust version:
rustc --version
The expected output should look like this, with the version being a minimum of 1.75.0:
Part 4b: Install Git
Let’s proceed with the installation of Git version control. When prompted to confirm, please enter “Y” to continue:
sudo apt install git
Part 4c: Install Docker
We will now install a set of essential packages, including apt-transport-https, ca-certificates, curl, and software-properties-common:
sudo apt install apt-transport-https ca-certificates curl software-properties-common
Now, let’s download the Docker repository’s GPG key and add it to the system’s APT keyring:
curl -fsSL https://download.docker.com/linux/ubuntu/gpg | sudo apt-key add -
Let’s adds the Docker package repository with the “amd64” architecture and the release codename obtained from “lsb_release -cs” to the system’s package sources list. When asked if you want to continue, press “Enter”:
sudo add-apt-repository "deb [arch=amd64] https://download.docker.com/linux/ubuntu $(lsb_release -cs) stable"
We will now install the Docker Community Edition (docker-ce) package.
When asked for confirmation, please confirm by entering “Y” to proceed:
sudo apt install docker-ce
It’s time to start the Docker service:
sudo systemctl start docker
… and finally enable the Docker service:
sudo systemctl enable docker
Part 4c: Install The Final Dependencies
We will proceed by updating all packages once more and installing additional dependencies. To ensure a smooth process, please copy and paste the commands individually into your server, as pasting them all at once might result in errors:
sudo apt-get update -y && sudo apt-get upgrade -y

sudo apt install build-essential

sudo apt install pkg-config

sudo apt install libssl-dev

sudo apt install clang

sudo apt install protobuf-compiler
Part 5: Install And Configure Madara-CLI
Let’s continue by cloning the Madara-CLI repository from to the current directory using Git version control:
git clone https://github.com/karnotxyz/madara-cli
… and change the current working directory to the “madara-cli” directory:
cd madara-cli
In the next step, we will compile and build the “Madara-cli” project using the Cargo package manager:
cargo build --release
Now, we will initialize the setup:
./target/release/madara init
… and enter a app chain name. When asked to choose the mode for your app chain and the DA layer for your app chain, simply press “Enter” at each step to select the default option: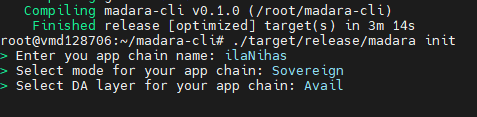 A new wallet will now be generated, and the secret key will be stored in the following file path:
 /root/.madara/app-chains/<APPCHAIN_NAME>/da-config.json. If this is your first time using Avail, you can proceed with this newly generated wallet. However, if you have previous experience with Avail, such as setting up a node or participating in previous Clash of Nodes challenges, you should consider replacing the newly generated wallet with your existing one. To do this, you need to open the existing JSON file using the following command, ensuring you replace <APPCHAIN_NAME> with the app chain name you previously selected:
nano /root/.madara/app-chains/<APPCHAIN_NAME>/da-config.json
Next, you should update the value within the “seed” tag with your wallet’s seed phrase and the value within the “address” tag with the address of your existing wallet: … so the file looks like this:
 Now, press “CTRL + X” to exit the file, then type “Y” to save the changes to the file, and finally, press “Enter” to confirm the file name.
Ensure that you use the #goldberg-faucet and have some amount of testnet AVL tokens available in this wallet address.
Part 6: Opening Required Ports
To ensure uninterrupted communication, we need to enable the firewall and open the following ports. I recommend starting with port 22, which is the SSH port. Opening this port first is important to avoid potential disconnection from your VPS. In case of disconnection, you can connect to your server’s console via VNC and open port 22 before resuming SSH access. To ensure a trouble-free process, please copy and paste the commands one by one into your server, as pasting them all at once might lead to errors:
sudo ufw enable
sudo ufw allow 22
sudo ufw allow 4000
sudo ufw allow 5353
sudo ufw allow 47250
sudo ufw allow 39276
sudo ufw allow 36347
sudo ufw allow 43759
sudo ufw allow 40815
sudo ufw allow 30333
sudo ufw allow 9944
sudo ufw allow 9615
Part 7: Install Screen
Let’s now installs the “screen” utility, which allows for the creation of multiple terminal sessions within a single terminal window:
sudo apt install screen
Now, let’s create a new screen session to to run processes and manage terminal sessions independently. I named mine “appchain” but feel free to choose something different:
screen -S appchain
We will now start out appchain:
./target/release/madara run
… when asked to choose your AppChain, simply press “Enter.” Please note that this process will take some time as it involves building a total of 1519 packages: Once the building process is complete, you’ll be asked to confirm if you’ve funded your wallet through the faucet; if you have, press “Y”. After a few minutes the the process should look like this:
 We can now exit the session with CTRL + A + D, to detach from screen without disturbing it. Please note that the Avail network is currently facing RPC downtime, so the output may display some errors. However, you can leave this screen session running in the background. Be sure to re-enter your session in the coming days to monitor its progress. If no processes are running, you may need to execute the following command once more:
 ./target/release/madara run
To re-enter your session, you can use the screen -ls command to list all the detached (running) screens along with their respective screen IDs. The result will look like this: To connect or attach to a specific running screen, you can use the following command:
 screen -x [screen id], replacing [screen id] with the screen ID obtained from the output of the previous command, like this: It’s important to be familiar with these essential screen commands to avoid accidentally starting multiple screen sessions running the same tasks:
- To detach from a screen without disturbing it, press Ctrl + A, then press D
- To Terminate/Stop a screen from running, press Ctrl + D while in a screen.
Part 8: Start Your Explorer
To begin, let’s first navigate to the root directory, then to the “madara-cli” directory, and finally, initiate the explorer. Replace XX.XX.XX.XX with the IP address of your node. Please execute each command individually for a seamless process:
cd
cd madara-cli
./target/release/madara explorer --host=XX.XX.XX.XX
The output will look like this: Now, open the explorer in your web browser by entering your IP address, followed by port 4000, like this: http://192.168.123.123:4000, for example. Once your explorer is open, switch to “Testnet” on the right-hand side. You’ll notice many zeros, indicating that the network is currently down. However, this should change once the RPC issues have been resolved. Just make sure to revisit this dashboard regurarely to check on it.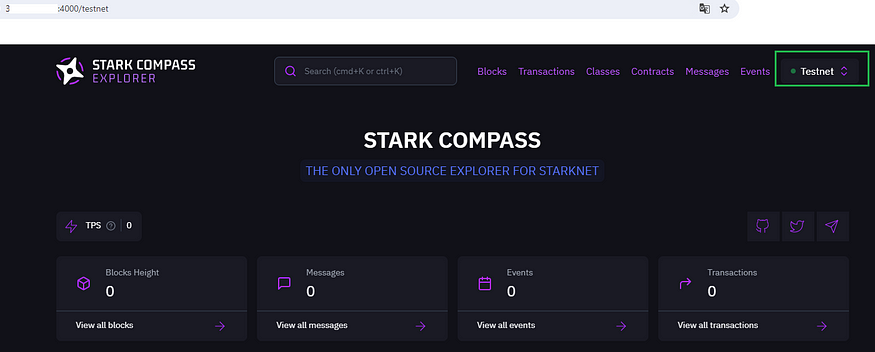
Part 9: Show Your Appchain on the Avail Leaderboard
Now, we need to create a JSON file and fill it with specific content. Begin by opening a blank text file, then paste the following template into it:
{
  "name": "my_app_chain",
  "logo": "https://placehold.co/400x400",
  "rpc_url": "https://rpc.myappchain.xyz",
  "explorer_url": "https://explorer.myappchain.xyz",
  "metrics_endpoint": "https://metrics.myappchain.xyz",
  "id": "942ff35e-f048-4d10-ae61-6cb970cad2f0"
}
Ensure you replace the placeholder content with your actual details:
- Name: Enter the name of your AppChain
- Logo: Upload your logo (it should be 400x400px). I used https://imgbb.com/ for uploading. Ensure you use the direct link ending in .png
- rpc_url: Replace this with the IP address of your VPS
- explorer_url: Also replace this with the IP address of your VPS
- metrics_endpoint: This should be replaced with the IP address of your VPS as well
- id: Assign any unique UUID here. For example, I used this website to create one. The value doesn’t hold special meaning — it just needs to be unique.
For guidance, my JSON file looks like this: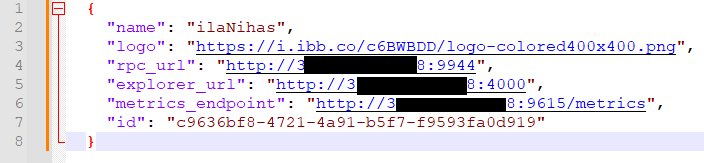 Now, save this file to your desktop with the filename structured as
 <UUID.json>. For example, if your UUID is c9636bf8-4721-4a91-b5f7-f9593fa0d919, name the file c9636bf8-4721-4a91-b5f7-f9593fa0d919.json. Make sure to use the .json extension to ensure proper formatting and recognition.
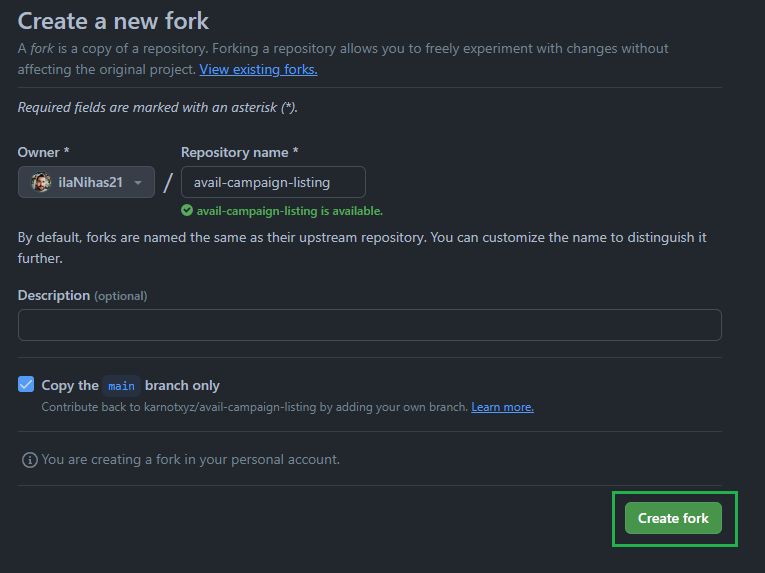
In the next step, we’ll upload this file to the GitHub repository, which we’re going to fork from “avail-campaign-listing.” So we first need to visit this repository, and click the “fork” button: Now, Leave all settings as default and click “Create fork.” This will create a fork of the main branch:
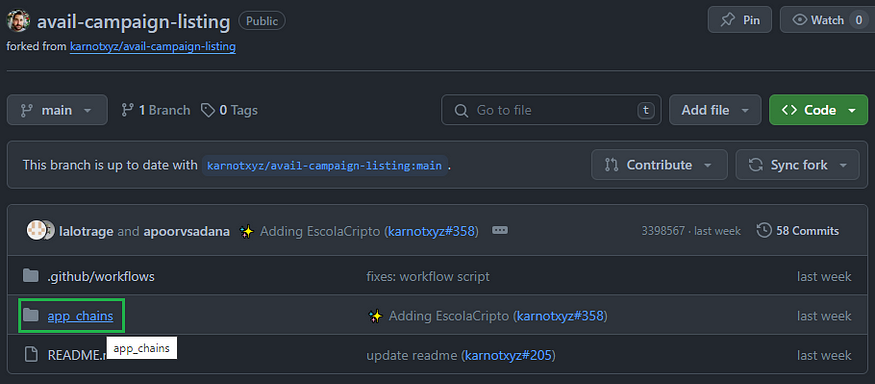
 Let’s now nagivate into the “app_chains” directory:
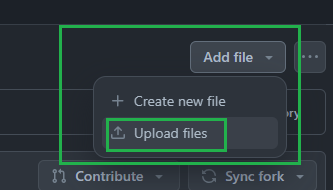
 … and then, click the “Upload file” button located in the top right corner.
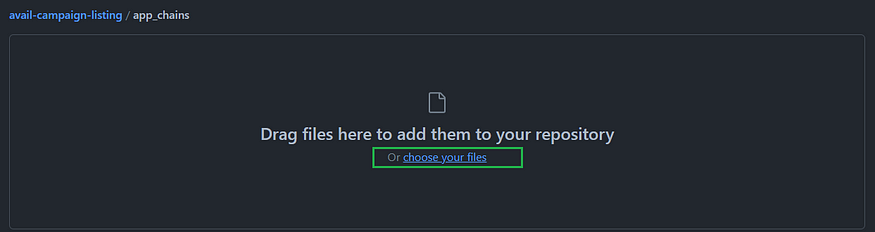
 Next, click the “Choose your files” button and select the JSON file that we created earlier:
 … and click the “Commit changes” button:
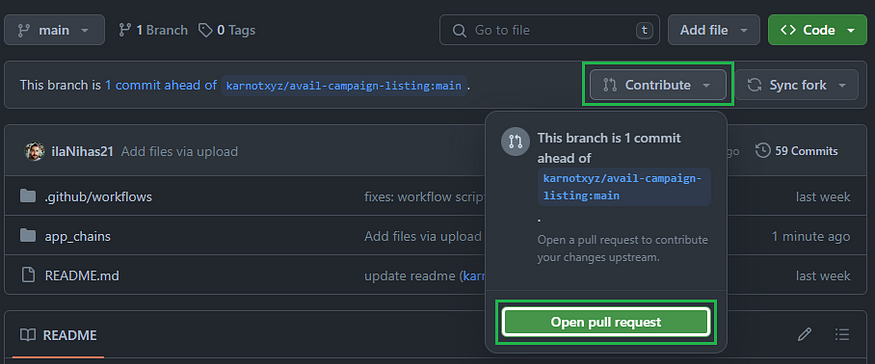
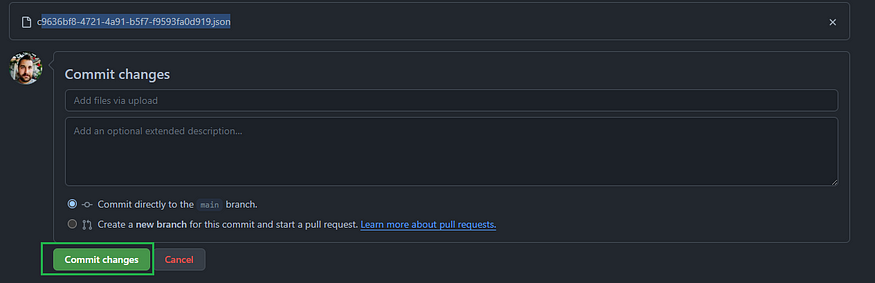 Afterward, click the “Contribute” button and then proceed to click the “Open pull request” button:
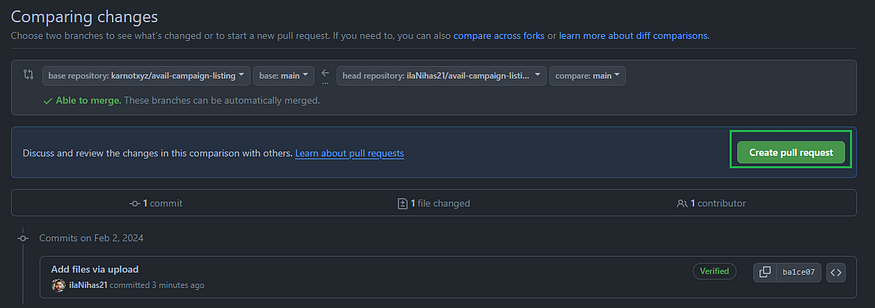
 Now, click create the “Create pull request” button:
 In the final step, I will set the title as “✨ Adding AppChain ilaNihas” and in the description field, write “This is my first Avail AppChain named ilaNihas”. You will need to customize this and then, click “Create pull request” to complete the process.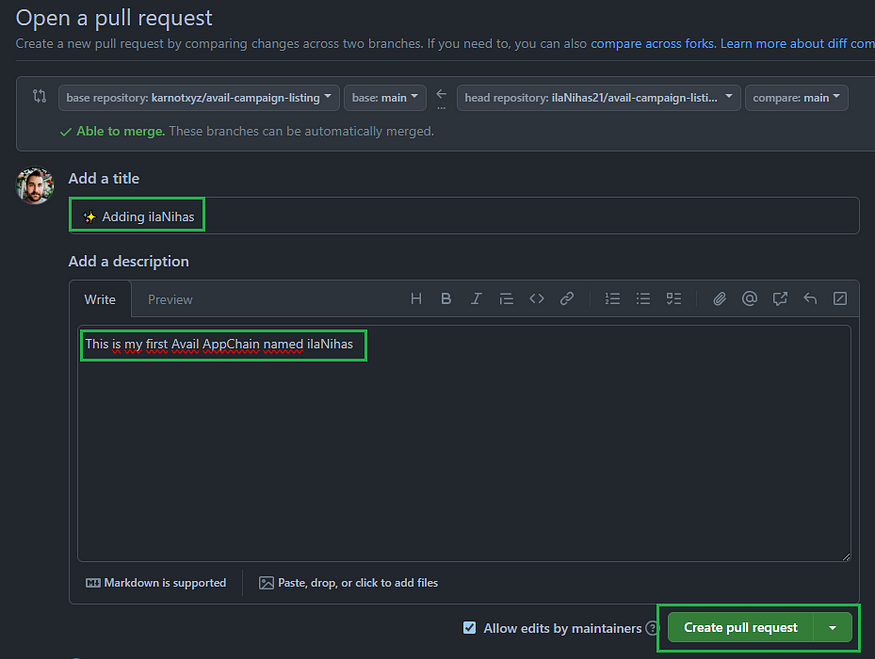
Step 10: Check the Clash of Nodes leaderboard
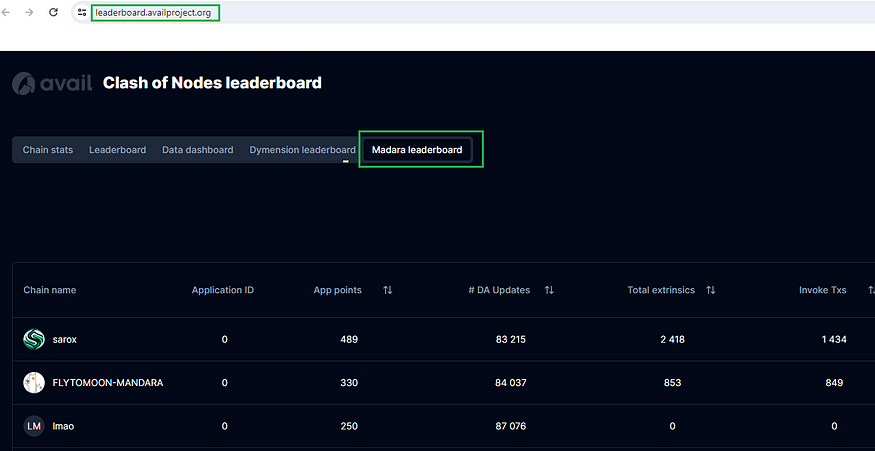
If we’ve done everything correctly, our pull request should be automatically merged, and our AppChain should appear on the official leaderboard. To verify, visit https://leaderboard.availproject.org/, check the “Madara leaderboard” tab, and confirm your AppChain is listed. If your pull request isn’t auto-merged, consult the readme file of the Github repository for guidance: https://github.com/karnotxyz/avail-campaign-listing.
Possible reasons for a failed merge might be:
- Relevant ports aren’t open
- The explorer isn’t reachable → verify by opening http://<YOUR_IPADRESS>:4000/ in your browser
- The metrics page isn’t reachable → confirm by accessing http://<YOUR_IPADRESS>:9615/metrics/ in your browser
- Your JSON file isn’t correctly formatted → rectify this using the “Prettier” extension in VSCode or the “prettier” command in Ubuntu systems, e.g.,
npx prettier@latest - write 125a148b-989b-4101-be31–67a63084f77e.json.
Step 11: Get the AppChain Builder role
For the final step, return to the Discord server, go to the #appchain-builders channel, and click the “I Agree” button to complete the process.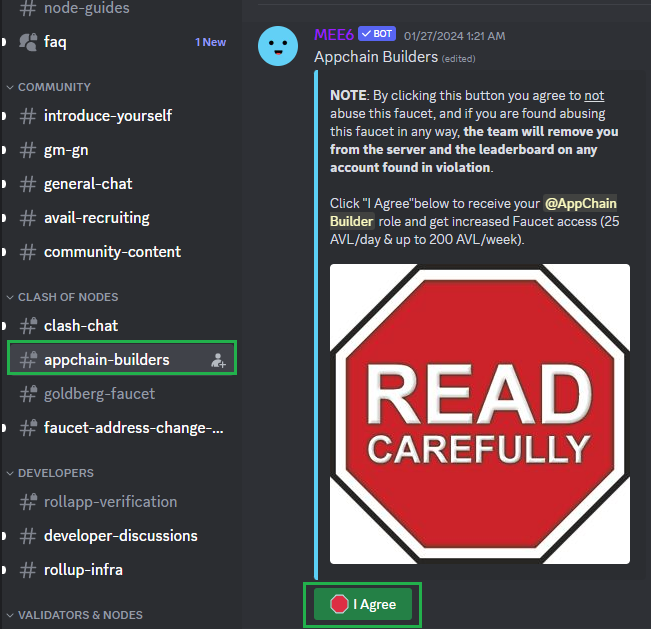 Following this step, you will receive the @AppChain Builder role:
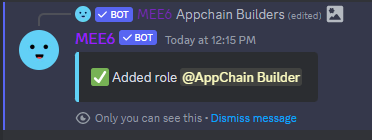 This enables you to claim 25 AVL tokens per day and up to 200 AVL tokens per week using the following command. This support makes it more convenient to manage your AppChain and conduct testing to contribute to the project:
/deposit-rollup <YOUR_ADDRESS>
Congratulations! You have successfully deployed your first AppChain. Stay informed about Avail, Madara and Karnot, by monitoring updates on their socials for the latest news and information.
For troubleshooting, consult the official documentation first, and if needed, seek assistance in the “#appchain-builders” channel on the official Discord server or feel free to reach out to me directly on our Discord community.
About me
Hi! I’m ilaNihas, a big football fan (or soccer, if you prefer). After 13 years in IT, I paused my career to explore crypto, blockchain, and Web3. I’m fascinated by the potential and constantly searching for interesting projects, airdrops, and new nodes to explore. Join me as I combine my passions for sports, writing, and tech. Let’s dive into the world of crypto and blockchain together!
Thanks for reading! Please share your feedback in a comment and follow me on my socials if you enjoyed the article. I’ve also set up a Discord community where we can get together and have discussions about interesting crypto-related topics. You’re welcome to join us and be part of the conversation → https://discord.gg/zN4dH35JJZ
- Discord: ilaNihas
- Twitter: @ilaNihas21
- Medium: ilaNihas 🌍
Disclaimer
Please note that the content provided on this blog is intended solely for educational, informational, and entertainment purposes and should not be considered as financial advice. In summary, always do your own research, evaluate the information critically, and seek professional advice when necessary. Stay informed, exercise caution, and make well-informed decisions based on your own unique circumstances.